How to upscale a photo on a Mac without uploading it
Open Crisp, add the photo to the timeline, type fix the grain in this photo and press Do it. Crisp sets Denoise to 0.6, which swaps in its denoising model and adds a cleaning pass before the upscale. On photos where I added the grain myself, that landed 0.4 to 2.9 dB closer to the clean original than the Upscale photo button. It cannot bring back detail the grain buried, and at heavy grain the button's smoother result may look better to you.
The short version
-
Open Crisp
Grab the free Crisp app for Mac and open it. Everything runs on your Mac. Nothing is uploaded.
-
Add the photo to the timeline
Drag the photo onto the window, or press Import, then press Add as photo (3s) on its card. The prompt bar works on the selected clip, so the photo has to be on the timeline.
-
Ask for it in one sentence
Click the prompt bar, type fix the grain in this photo and press Do it. Crisp turns that into an upscale with Denoise set to 0.6 and says so in the job's route.
-
Find the result
When the job finishes Crisp says so and updates the clip on your timeline. The cleaned photo is saved next to the original as yourphoto_crisp.jpg, and the original is kept.
Photos from an iPhone work the same way: Crisp reads a HEIC directly, as I measured in how to upscale a photo on a Mac.
What the sentence changes
The Upscale photo button runs the Auto preset with its own guess at the cleanup, a Denoise of about 0.4. Asking for the grain to be fixed runs the same Auto preset with Denoise 0.6. Above 0.5 Crisp switches to its denoising model and adds a temporal and spatial cleaning pass (hqdn3d) in front of the upscale, which is why 0.6 behaves so differently from 0.4. I wrote up the model switch in what the denoise setting does.
There is one thing I have to own. Before version 1.0.1460 Auto ignored the 0.6, so the sentence did nothing and the picture came out as if you had asked for nothing. I found it while measuring this page and fixed it. If you are on 1.0.1458 or older, update first.
What I measured
I took two photos that are already on this site, halved each, added Gaussian grain I could control (light and heavy, fixed seed), saved them as JPGs at quality 95, upscaled them 2× with the installed Crisp 1.0.1460, and scored each result against the clean original with PSNR. Higher means closer to the clean photo. I wrote the method down before running anything, and I changed it twice after seeing numbers, which I explain at the end.
| Photo and grain | Plain resize | Upscale photo button | “Fix the grain” |
|---|---|---|---|
| Boxing frame, light grain | 33.11 dB | 31.27 dB | 34.17 dB |
| Boxing frame, heavy grain | 25.91 dB | 25.86 dB | 26.29 dB |
| Newsreel frame, light grain | 33.11 dB | 29.54 dB | 31.76 dB |
| Newsreel frame, heavy grain | 26.31 dB | 25.28 dB | 26.21 dB |
- Against the button, the one-sentence request scored 2.9, 0.4, 2.2 and 0.9 dB higher.
- Against a plain resize it won on the boxing frame (by 1.1 and 0.4 dB) and lost on the newsreel frame (by 1.4 and 0.1 dB). If your photo has little grain, a plain resize can be the closest to the original.
- Edges: on the boxing frame the original measures 36.6 on a steepness scale, a plain resize 36.3 and 39.3, the button 31.4 and 30.6, and the grain fix 39.8 and 39.6. The button softens edges, and the grain fix keeps them and then some.
- Pushing the strength to 1.0 gained only 0.1 to 0.2 dB over 0.6, so 0.6 is not leaving much behind. The app has no control for it anyway.
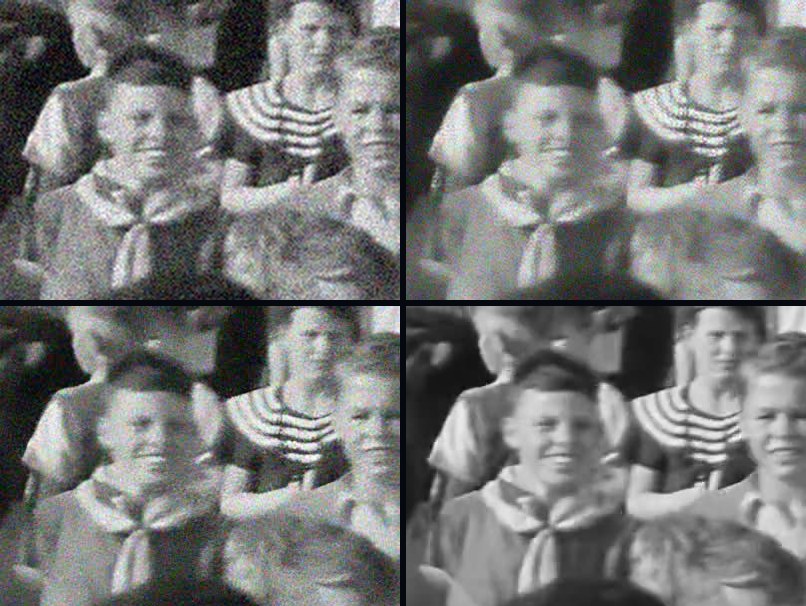
To my eye the numbers and the pictures only half agree. The grain fix leaves some fine grain and keeps the edges crisp, and the button's result is smoother and softer, which looks cleaner at a glance and loses more of the face. PSNR does not decide which you would rather look at, so treat the table as a guide and look at your own photo.
What no grain fix can do
Grain hides detail, and a model can only guess what was under it. It makes grain less visible and edges clearer, and it cannot rebuild a face the grain swallowed or sharpen a photo that was out of focus; why AI upscaling can’t fix focus shows why. If the grain is film texture you like, film grain vs digital noise covers when to leave it alone.
The size is chosen for you. A small photo is enlarged more than a big one: a 640×360 photo came out at 2560×1440 in my real run through the app, and a 12-megapixel iPhone photo is enlarged 2×. My table used 2× for every arm so the sizes matched the clean original.
How I measured this
Installed Crisp 1.0.1460 on an M1 Ultra Mac Studio, a fresh profile, one job at a time. The three routes in the table are a plain Lanczos resize, the Auto preset with nothing named (what the button runs) and Auto with Denoise 0.6 (what the app plans for “fix the grain”, which I read from the app's own planner). I ran the sentence through the real app too: it queued a job with Denoise 0.6, and the app said it was done. I changed the method twice after seeing numbers: the first run used two posters that turned out not to be grainy, and the second used slider values the app does not offer. Both changes were written down before the final run.
Questions people ask
How do I fix a grainy photo on a Mac?
In Crisp, add the photo to the timeline, type fix the grain in this photo in the prompt bar and press Do it. Crisp upscales it with Denoise set to 0.6, which uses its denoising model and a cleaning pass before the upscale, and saves the result next to the original. It runs on your Mac and nothing is uploaded.
Will fixing the grain make my photo blurry?
It can look softer, and it depends on how heavy the grain is. In my tests the grain-fix result kept edges about as steep as a plain resize or steeper, and on a heavily grainy photo the default Upscale photo button gave a smoother and softer picture that some people will prefer. Try both on your photo and keep the one you like.
Does the Low-light preset fix grain?
Not on a well-lit photo. The Low-light preset lifts the shadows as well as cleaning, so it brightens the picture. On my grainy test photos it scored about 16 dB against the clean original, while the other routes scored 25 to 34. Use it for dark photos and use the one-sentence request for grain.
Is it free, and does it work offline?
It works offline: the photo never leaves your Mac. The free copy does the job, and in the version I measured it put no mark on photos; the small Made with Crisp mark goes on video only. Pro is $129 once. There is a 30-day refund, no reason needed.
Related
- How to upscale a photo on a Mac without uploading it
- How to remove noise and grain from a video on a Mac
- What the denoise setting does
- What a video enhancer does