How to upscale a photo on a Mac without uploading it
Open Crisp, drop in the photo, and press Upscale photo on its card. The enlarged copy is saved next to the original as name_crisp.jpg. On four test photos it took 2.6 to 5.2 seconds each, and nothing is uploaded. One catch: an iPhone HEIC photo does not work yet in version 1.0.1455, so convert it to JPG first.
The short version
-
Open Crisp
Grab the free Crisp app for Mac and open it. Everything runs on your Mac. Nothing is uploaded.
-
Drop the photo in
Drag the photo anywhere onto the window, or press Import. It shows up in the Media panel as a photo card.
-
Press Upscale photo
Press Upscale photo on the photo's card. You can also select the photo, type upscale it to 4k in the prompt bar and press Do it. When the job finishes, Crisp says so.
-
Find the copy
The enlarged photo is saved next to the original, named yourphoto_crisp.jpg. The original is not touched.
How big the copy comes out
The Upscale photo button runs the Auto preset. Auto and the Enhance → 4K preset both aim at a picture about 2160 pixels tall and pick the closest whole-number factor: 2×, 3× or 4×. A photo around 720 pixels tall is enlarged 3×. A photo around 1080 pixels tall is enlarged 2×, which lands on exactly 3840×2160. A big phone photo is enlarged 2×, the smallest step, so it still gets the cleanup. Here is what the button did on four photos that are already on this site:
| Photo | Size in | Size out | Factor | Seconds (two runs) |
|---|---|---|---|---|
| Demo still, JPG | 1704×896 | 3408×1792 | 2× | 3.7 and 3.7 |
| Archival frame, JPG | 1068×772 | 3204×2316 | 3× | 4.2 and 2.6 |
| Newsreel frame, JPG | 960×720 | 2880×2160 | 3× | 4.2 and 3.2 |
| Boxing frame, JPG | 1280×720 | 3840×2160 | 3× | 5.2 and 4.2 |
The prompt bar can pick a different factor from the button. Asked to upscale it to 4k, it enlarged the first photo 3× to 5112×2688, where the button chose 2×. If you care about the exact size, check the result.
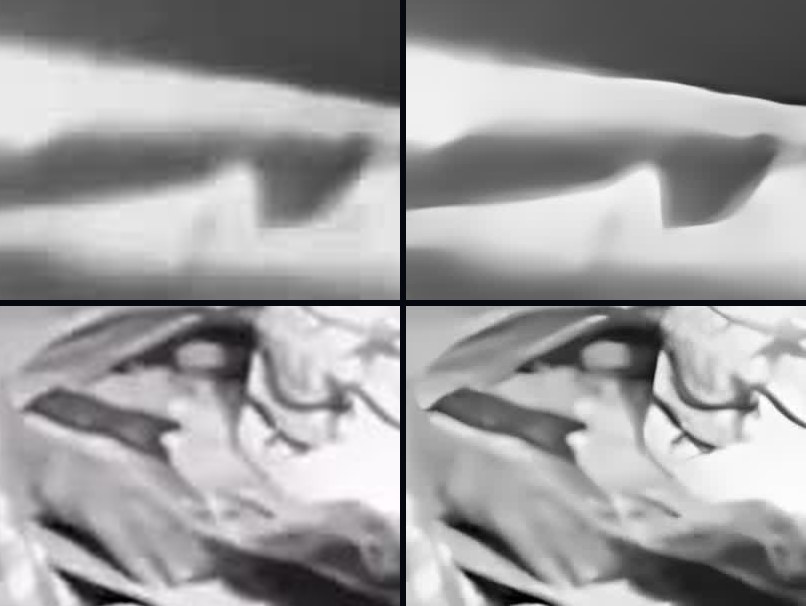
The right-hand crops have steeper edges and quieter flat areas. They also look a little smoothed, in places almost painted. That is what drawn detail looks like up close. I would call it a clear gain for viewing and printing at a larger size, and not a recovery of what the camera missed.
What goes in and what comes out
I tested each of these with a copy of the same photo. Crisp keeps the format when it can write it:
| You drop in | You get | Checked |
|---|---|---|
| JPG | JPG | Yes |
| PNG | PNG | Yes |
| TIFF | TIFF | Yes |
| BMP | BMP | Yes |
| WebP | PNG | Yes |
| PNG with transparency | PNG, transparency kept | Yes |
| HEIC from an iPhone | An error | Fails in 1.0.1455 |
The transparent PNG matters if you upscale logos or stickers. In my test a corner I had made fully transparent stayed fully transparent, and the rest stayed opaque.
iPhone photos: one extra step
I found this while writing this page, so I will not skate over it. An iPhone saves a photo as a HEIC file made of 512-pixel tiles. Crisp's photo lane hands the file to its video tool with a filter, the tool opens a tiled HEIC its own way, and the two collide. The job ends in an error in under a second. A small HEIC with a single tile worked, and a JPG of the same picture worked. iPhone photos are normally stored as 512-pixel tiles, so I expect every one to fail. I tested a HEIC my Mac wrote, not a photo from a phone, so check yours, and plan on converting first.
The quickest fix is the one your Mac already has: select the photos in Finder, right-click, Quick Actions, Convert Image, pick JPEG at the highest quality, then drop the JPGs into Crisp. The details, including what a conversion keeps and drops, are in how to convert HEIC to JPG on a Mac. Keep the HEIC originals.
Does the free copy mark a photo?
In version 1.0.1455, no. The small “Made with Crisp” mark goes on video exports only. The code says photos are left alone, and I checked it instead of trusting the comment. I compared the free app's photo output with the engine's own output for the same photo: the largest difference was 27 brightness levels, scattered, with nothing in a corner. The control was a video run the same way, where about five thousand pixels in the bottom-right corner differed strongly. That is the mark, and it shows the check can see one. Policies change, so this describes this version.
What upscaling a photo can and cannot do
Upscaling draws what it expects to be there. That works well on edges, text-like shapes and noise, and it cannot rescue a photo that was blurred by focus or motion, because there is no sharp edge to find. I wrote that up in why AI upscaling can’t fix focus. If the photo is grainy, the Denoise slider decides how much grain the model removes, and a higher value costs some sharpness, which I measured in what a video enhancer does.
Two limits come from the code. A very large photo is capped: Crisp cannot write an intermediate image past about 268 megapixels, so a big photo is enlarged by a smaller factor, and if even 2× would be too big it tells you to resize the photo a little first. And Max quality, the most thorough restore, is a Pro feature that needs a one-time model pack of about 4.6 GB. Max works on a single photo on a Mac with 16 GB of memory. I did not measure it here.
Does it stay private? The photo never leaves your Mac. The offline editing page measured ten real jobs with no connection outside the machine.
How I measured this
Crisp 1.0.1455 on an M1 Ultra Mac Studio with other work running (load average about 3), with a fresh profile so it ran as the free copy. I used the app's engine with the Auto preset, the one the Upscale photo button uses, on four photos already published on this site, and each was run twice. The format table used copies of the newsreel frame saved as PNG, TIFF, BMP, WebP and a PNG with a transparent corner. The HEIC was made with the Mac's own sips tool. I wrote down what I would measure before running anything. The numbers are for this Mac, so your seconds will differ.
Questions people ask
Can I upscale an iPhone HEIC photo in Crisp?
Not directly in version 1.0.1455. A HEIC from an iPhone is stored in tiles, and Crisp's photo lane fails on those files with an error within a second. Convert the photo to JPG first (Finder's Convert Image Quick Action takes a few seconds), then upscale the JPG. A small single-tile HEIC did work in my test, but iPhone photos are normally tiled. I tested a file my Mac wrote, not one from a phone.
Does Crisp put a watermark on an upscaled photo?
Not in version 1.0.1455. The free copy's small Made with Crisp mark goes on video exports only. I checked by comparing the free app's photo output with the engine's own output, which differed by at most 27 brightness levels with nothing clustered in a corner, while a video made the same way showed the mark in the bottom right.
How long does it take to upscale a photo?
On an M1 Ultra Mac Studio, 2.6 to 5.2 seconds for photos between 0.7 and 1.5 megapixels, enlarged to between 6 and 8 megapixels, with other work running on the Mac. Larger photos take longer. Treat that as a rough guide for your own Mac.
Does upscaling a photo add real detail?
It adds drawn detail. The model guesses what the edges and textures looked like, and a good guess looks sharp. In my crops edges came out steeper and flat areas cleaner, and some textures looked smoothed or painted. A photo that was never in focus has no real edge to recover, so it stays soft.
Related
- How to convert HEIC to JPG on a Mac
- How to upscale 480p to 1080p on a Mac
- What is AI video upscaling?
- The best free video upscaler for Mac